
AKTA PURE Protocol
- Richard Knappenberger

- Sep 21, 2022
- 5 min read

First-time users, please contact Mr Richard Knappenberger (rjknapp@udel.edu) in the Parashar laboratory.
Section 1: UNICORN START-UP
Section 2: METHOD EDITOR
Section 3: Setting up the AKTA for a Run
I. Initial Setup
II. Purge Pump B (Do First) and Pump A
III. Purge Sample Pump
IV. Attach a Column
V. Things to Check Before Running the AKTA
VI. Running Your Protocol
Section 1: UNICORN START-UP
1. Open the Unicorn software

2. Select all the boxes for: Method Editor, System Control, Admin, Evaluation
a. Leave User Name: Default
b. Leave Access Group: Administrators
3. The System Control should start loading the system settings
a. If it does not do this select following icon in the upper tool bar and click the check box next to the AKTA prompt

4. The AKTA may pull up a Maintenance Notification at this point. Let the lab manager of this system know so they can deal with this immediately.
a. NOTE: If the notification is Replace Pump Wash Solution, please do so. Leave the rest of the maintenance to the AKTA manager. Follow instructions below:


Section 2: METHOD EDITOR
1. After starting Unicorn, open up Method Editor.
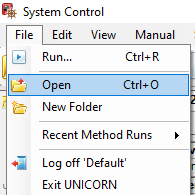
2. From here select file:

3. Open up a method for the type of column you are running:
If you are running a column that needs to be regenerated, make sure to run the regeneration protocol first before setting up the AKTA for your purification run.
4. In this protocol check the following positions you will be using to make sure you use correct ones:
Column position
Buffer and Sample Inlets
Outlets
Fraction collector (1 or 2)
Fractionation volumes (5mL or 15mL)
That flow rate does not exceed column’s max rate
5. Once the program has been set and edited make sure to save it.
NOTE: Try to limit the number of protocols you save as this will slow down UNICORN. Keep one protocol for each of your proteins and just edit as need be. DO NOT save a different protocol for each run. Note the differences between this run and last in your lab notebook or somewhere else.
Section 3: Setting up the AKTA for a Run
I. Initial Setup
1. Make sure that all sample inlet tubing that is to be used during the method run is immersed in the correct buffers.
2. Make sure that the waste tubing connected to Injection valve port W2 is immersed in a waste vessel and the waste tubing connected to the Injection valve port W1 is placed in a waste vessel. Make sure waste beaker is not overfilled.
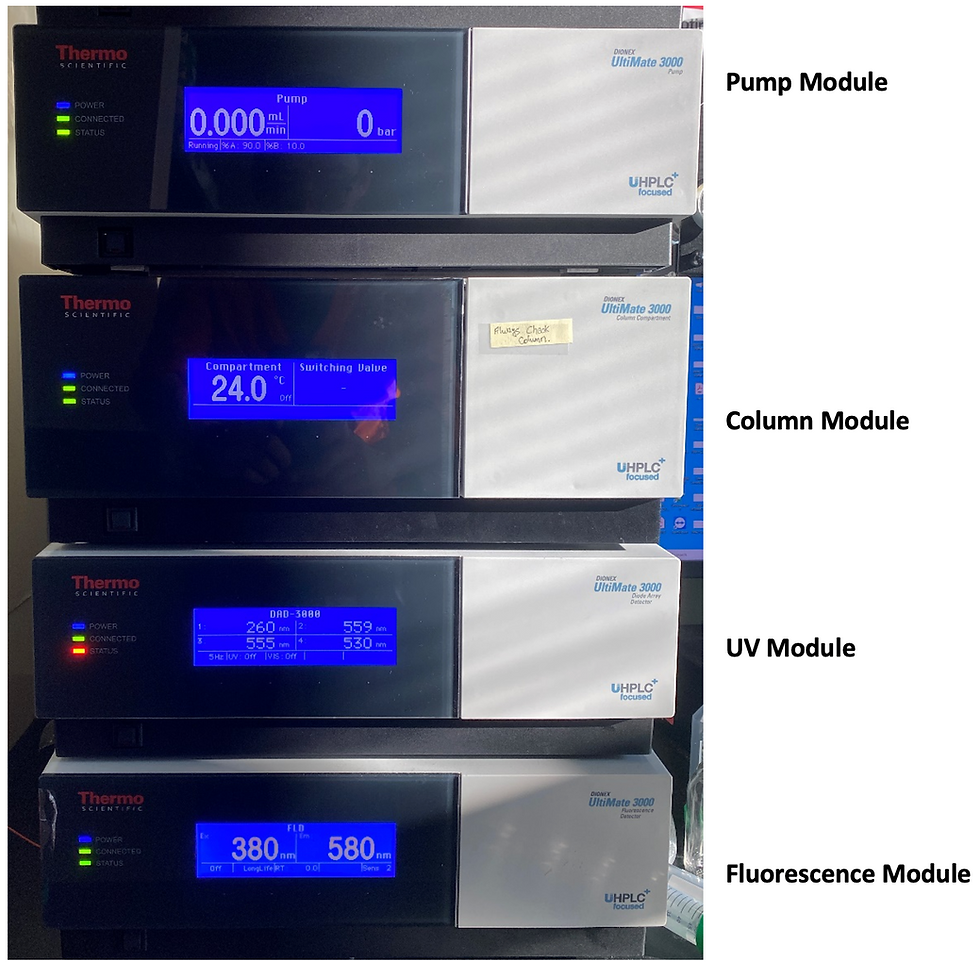
3. Open the system control module
4. In the process picture click on the Sample Inlet, A inlet, and B inlet and change them to the position you will be using during your run.

5. Connect a 25 to 30 ml syringe to the purge valve of one of the pump heads of the pump that is being prepared. Make sure that the syringe fits tightly into the purge connector.

6. Open the purge valve three-quarters of a turn. Draw liquid into the syringe until the buffer reaches the syringe (~5-10mL). Close the purge valve.
7. Repeat for each inlet tubing to be used.
II. Purge Pump B (Do First) and Pump A
1. Make sure the waste tubing W1 is in the correct vessel.
2. In Process Picture
a. Click on the Injection valve and select System pump waste
3. In Process Picture:
a. Click on pumps (in red)

b. Set concentration B to 100%

4. In Process Picture:
a. Select the correct buffer inlets being used during your run.
5. In Process Picture
a. Click on pumps and set flow rate to 1ml/min
6. Connect a 25 to 30 ml syringe to the purge valve of one of the pump heads of the pump that is being prepared. Make sure that the syringe fits tightly into the purge connector.

7. Open the purge valve three quarters of a turn. Draw liquid into the syringe until the buffer reaches the syringe (~5-10mL). Close the purge valve.
8. Repeat for the other pump head.
9. Validate that the purge was successful by changing the Inlet valve to Manual Load
a. Watch to see if the PreC pressure stabilizes
10. Repeat process for Pump A but with 0% Buffer B
11. Click End run in toolbar

III. Purge Sample Pump
1. Make sure you primed the sample inlet pump from Initial Setup portion
2. Make sure the sample pump is in the correct buffer to be used (use buffer A as to not waste sample).
3. Make sure waste W2 is in a waste vessel.
4. In Process Picture select sample pump to waste
5. In Process Picture select Sample Pump

6. Set flow rate to 1ml/min
7. Connect a 25 to 30 ml syringe to the purge valve of one of the pump heads of the pump that is being prepared. Make sure that the syringe fits tightly into the purge connector.
8. Open the purge valve three quarters of a turn. Draw liquid into the syringe until the buffer reaches the syringe (~5-10mL). Close the purge valve.
9. Repeat for the other pump head.
10. Validate that the purge was successful by changing the Injection valve to Direct Inject
a. Watch to see if the PreC pressure stabilizes
11. Click End run in toolbar
IV. Attach a Column
1. Place a column holder on the AKTA and place your column there
2. Connect the tubing to the correct column valve port
3. Open the System Control Module
4. In Process Picture click on the column and select down flow and the column position

5. Make sure column inlet is attached to AKTA and detached from column
6. In Process Picture select pumps and set flow rate to 0.2ml/min
7. Once the buffer starts coming out of the tubing attach it to the column.
8. Remove the column outlet tubing from the column outlet position and wait for buffer to start coming out before attaching.

9. Click End run in toolbar .
V. Things to Check Before Running the AKTA
1. Make sure your outlet tubing is in an outlet bottle or waste vessel.
2. Make sure you are using all the correct column positions, outlets, inlets, etc.
3. Make sure the waste vessel is not going to overflow
4. Make sure the column inlet and outlet tubing are attached in the column and the AKTA. Tug on the tubing to make sure it is fully in both positions.
5. MAKE SURE ALL THE PURGE VALVES ARE CLOSED. (Do not overtighten.)
6. Make sure you are using the right size fraction collector tubes and that the fraction collector toggle is set for the right tubing.
7. Make sure all the inlet tubing is at the bottom of your buffer bottle. Use the black caps with positions to slide tubing through or use the blue tubing holders.
8. Make sure you did not introduce any air into the tubing
VI. Running Your Protocol
1. Once the above are all done and checked, then AND ONLY THEN proceed to run your method.
2. In the System Control Module:
a. Click File and then Open
3. Double click on the method you want to run.
a. A dialog box will open:
i. Check that the date and method are correct
ii. Fill out the Name:
1. Include Protein, Date, Column type
iii. Note if you do not want to save the run, then under Results select the No result box (best used for column regenerations like Nickel IMAC).
4. Click Start.
5. If you want to run multiple runs, then select a second method and repeat the above. It will place this in the queue.
a. You can check the queue by going to System in the toolbar and then Running Methods
b. You can alter the order of your runs here.
Useful Videos from YouTube
Comments